
To change the design of the registration and sign-in pages, go to the ELMA365 workspace with the external portal enabled. Then go to the portal page and click on the gear icon next to the word Portal. This will open a settings window with two tabs: Theme settings and Authentication.
Начало внимание
Only users included in the Administrators group can change the design and sign-in settings of the portal.
Конец внимание
Theme settings tab
On the Theme settings tab, you can customize the individual design of the registration and sign-in pages on the portal.
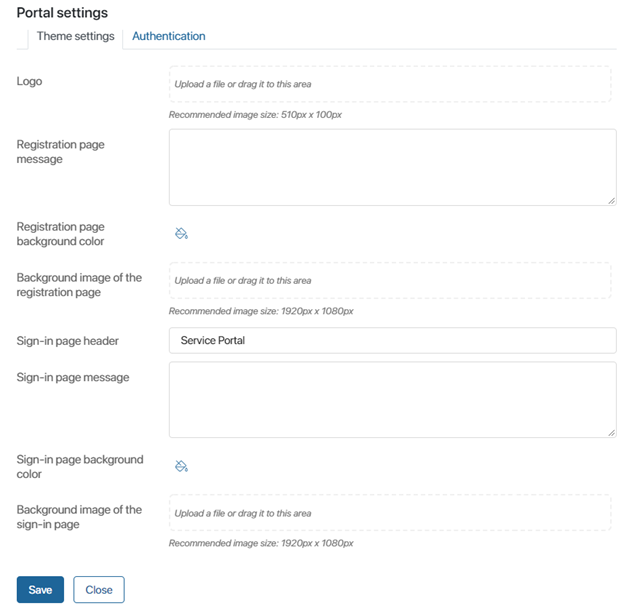
You can:
- Upload the company logo that will be shown on both pages;
- Add a message to be shown in the data entry form on the pages;
- Edit the header on the sign-in page;
- Set a background color for the pages;
- Set a background image.
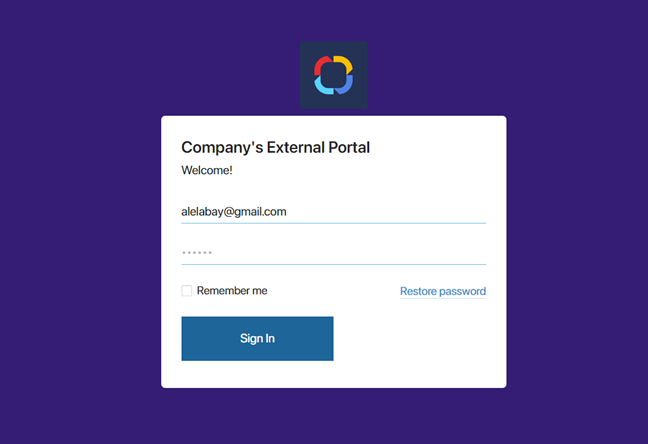
Below you can see an example of a customized sign-in page. It has a logo added to it, the background color, the company’s portal header, and the Welcome! message have been changed.
Authentication tab
On this tab, you can:
- Allow password recovery;
- Limit the ways of signing in to the portal;
- Configure two-factor authentication;
- Allow signing in by phone number;
- Connect a module for signing in to the portal via an external service.
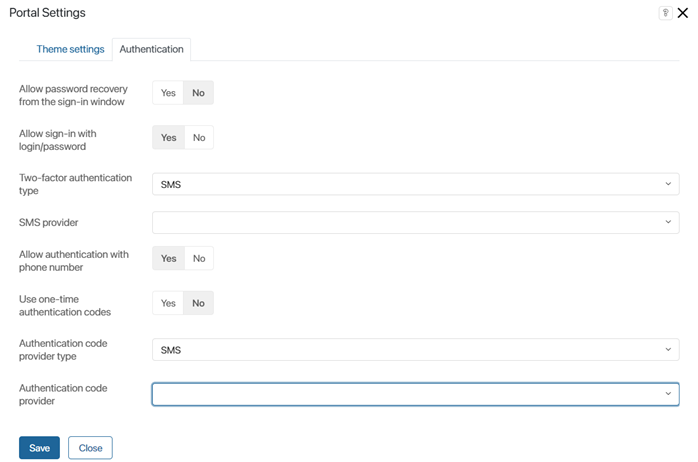
- Allow password recovery from sign-in window. Enable the option to display the Recover password link in the sign-in window. Users will be able to enter the email or phone number specified during registration, click on the link, and change their current password by following the instructions sent;
- Allow sign-in with login/password. Using this option, you can limit the ways users can sign in on the portal. For example, if authentication is performed via an external service, sign-in with login and password can be disabled for better security;
- Two-factor authentication type. In addition to password authentication, you can use two-factor authentication for external users. This will increase the security of the account. Select the two-factor authentication type:
- SMS. To sign in, the external user will need to enter an individual code from SMS in addition to the login and password. The code is sent to the number specified in the external user page in the Phone field;
- SMS provider. Select the provider to send a SMS with the authentication code. Integration with SMSCenter and SMSRU providers is available in the system. If the provider is not in the list, make sure that the integration module is enabled and configured for it;
- Email.To sign in the external user should enter not only login and password, but also individual code from the email. It is sent to the email specified in the Email field on the external user page.
- SMS. To sign in, the external user will need to enter an individual code from SMS in addition to the login and password. The code is sent to the number specified in the external user page in the Phone field;
Important: in ELMA365 On-Premises the authentication code is sent via the SMTP server specified during system installation.
- Allow authentication with phone number. Users can register, sign in, and recover the password using their phone number. They do not need to additionally enter their email address.
It is important to note that to sign in to the portal and recover the password with the phone number, it is necessary to confirm the number. At the moment, number confirmation is available only when registering a new user.
- Use one-time authentication code. Enable the option to allow external users to sign in on the portal using a one-time verification code without entering login and password;
- One-time code provider. Currently, only SMS type is available for selection;
- One-time code provider. Select the configured SMS sending module from the drop-down list. The selected provider will send one-time codes to sign in to the portal. If the provider is not in the list, make sure that the integration module is enabled and configured for it;
- Allow OAuth2 authentication. Users can sign in on the portal via an external service.
- Providers. Select modules for authentication via an external service. To learn how to create and configure the module, see Custom OAuth2 module for authentication via an external service.
If you want to automatically create an external user at the time of such authentication, enable the Automatic registration option. The new entry will appear in the External users directory if there is a free portal license. It is not necessary to send an invitation to the user.
The user will not be able to sign in through an external service if:
- automatic registration is enabled, but there are no free portal licenses;
- Automatic registration is disabled. In this case, add the user manually and send them an invitation link.
- LDAP/AD settings. Select the server with external users from AD/LDAP that should be granted access to the portal. To ensure that not all imported external users are granted access, enter a filter similar to the external user filter specified in AD/LDAP module settings;
- SAML settings. Specify a provider from the SAML module that will allow external users to sign in on the portal using a login and password from another system. For more information about configuring providers, see Configure SAML integration with Windows Server and Configure SAML integration with Microsoft Azure.
Found a typo? Highlight the text, press ctrl + enter and notify us