
Страницы портала представляют собой набор определённых данных, добавленных при помощи виджетов. Они настраиваются так же, как и страницы системы.
Вы можете создать страницы с собственной конфигурацией, добавив на них списки приложений, кнопки для создания элементов приложений или запуска бизнес-процессов, ленту уведомлений и т. д.
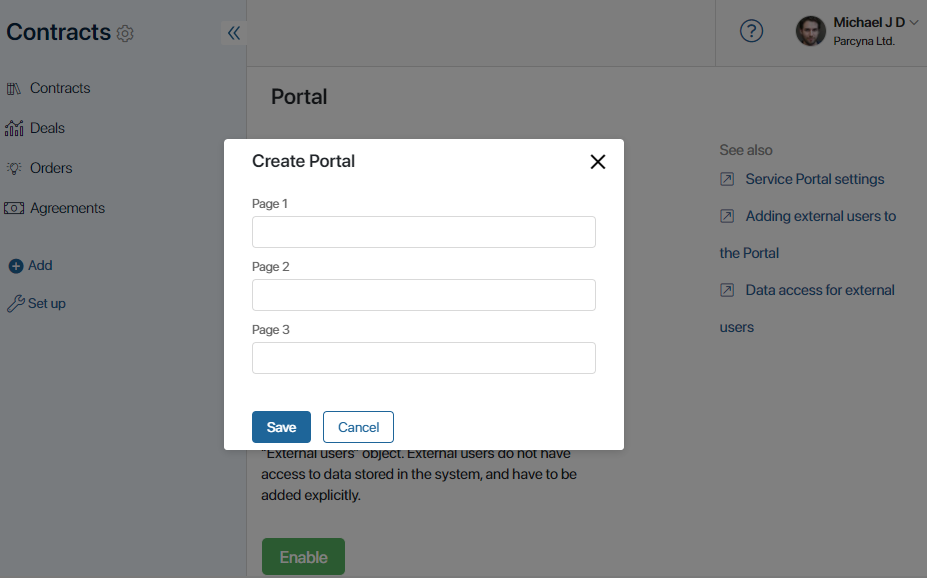
При включении портала вы можете выбрать способ его наполнения:
- Пустой — состоит из пустой главной страницы. Вы можете настроить её с нуля, а также создать дополнительные страницы;
- По шаблону — содержит:
- преднастроенную главную страницу с заголовком и виджетом навигации портала, с правой, левой и нижней панелями для размещения информации;
- три пустые страницы, которые можно наполнить виджетами самостоятельно.
Помимо настройки страниц, предназначенных для работы с порталом, вы можете изменить внешний вид страниц входа, регистрации и авторизации. Подробнее об этом читайте в статье «Настроить страницу входа на портал».
Наполнить пустой портал
При выборе опции Пустой на портал добавится Главная страница, которую нельзя удалить. Вы можете наполнить её виджетами, а также добавить свои дополнительные страницы. Для этого:
- Нажмите на кнопку +Страница в правом верхнем углу.

- Придумайте название страницы.

Ссылка на страницу формируется автоматически и используется для быстрого доступа к ней.
- Для завершения настройки нажмите кнопку Создать. После этого будет создана новая страница, которую нужно наполнить виджетами.
- Нажмите на страницу в списке, чтобы открыть дизайнер интерфейсов. Подробнее о наполнении страниц виджетами читайте в статье «Добавление виджета на страницу».

- После завершения настройки сохраните и опубликуйте страницу.
Добавленная по умолчанию Главная страница настраивается в дизайнере интерфейсов таким же образом, как и созданные вами страницы.
Наполнить портал по шаблону
Шаблон портала содержит:
- главную страницу, на которой по умолчанию размещены:
- Виджет заголовка страницы — на нём расположены название компании и её логотип, имя пользователя, а также кнопки Мои порталы и Выйти;
- Виджет навигации портала — используется для быстрого перемещения между страницами портала;
- дополнительные элементы страницы — панель заголовка, левая и правая боковые панели, нижний колонтитул. Отображение элементов можно отключить.
- три пустые страницы, которые можно наполнить пользовательскими данными. При этом на них также отображаются виджеты главной страницы.
Чтобы воспользоваться шаблоном, после включения портала выберите опцию По шаблону. В открывшемся окне укажите название для каждой страницы.

Затем нажмите кнопку Сохранить. Откроется страница настройки портала.
Страницы располагаются в порядке, в котором их будут видеть внешние пользователи, открыв портал. Этот порядок можно изменить, перетащив страницы с помощью метода drag’and'drop.
Чтобы добавить дополнительные страницы, используйте кнопку + Страница.
Изменить страницы портала по шаблону
Чтобы изменить главную или добавить данные на пустые страницы портала, перейдите в дизайнер интерфейсов. Для этого нажмите на название страницы в списке.
Также перейти в дизайнер интерфейсов вы можете, нажав на значок шестерёнки напротив названия страницы и выбрав пункт Конструктор.
В дизайнере интерфейсов вы можете:
- на главной странице отключить отображение добавленных по умолчанию элементов: заголовка, левой и правой боковых панелей, нижнего колонтитула. Для этого на верхней панели конструктора нажмите кнопку Настройки и уберите флажок напротив названия элемента.

- наполнить пустые страницы виджетами с данными. Подробнее о способах настройки виджетов читайте в статье «Добавление виджета на страницу».
После публикации портала на всех страницах также отображаются виджеты главной страницы.
Внесите изменения и нажмите кнопку Сохранить, а затем Опубликовать на верхней панели дизайнера интерфейсов.
Настроить динамическую страницу
Вы можете настроить динамическое отображение контента на одной и той же странице, используя виджет Навигатор. Например, можно добавить меню с ссылками на страницу. Когда пользователь переключается между этими ссылками, он видит разную информацию на одной странице без необходимости покидать её.
Предпросмотр и настройка страницы
Вы можете посмотреть, как будут выглядеть настроенные страницы портала для внешних пользователей. Для этого нажмите на кнопку Предпросмотр в правом верхнем углу страницы портала или на значок глаза напротив названия страницы.
Нажмите на значок шестерёнки напротив названия страницы, чтобы открыть меню, в котором доступны следующие возможности:
- Конструктор — открыть дизайнер интерфейсов;
- Настройки страницы — изменить название страницы или скопировать ссылку на неё;
- Копировать страницу;
- Удалить страницу.