
An online LiveChat is a chat that you can place on your website to communicate with customers. Do not confuse it with live chats that you use within the system. An online LiveChat is connected to a live chat in ELMA365 and embedded in an external website. Then people who visit your website can write their messages in the online chat, and operators reply to them from the ELMA365 interface. The entire history of communications with each user will be saved in the Live Chats workspace.
Moreover, you can connect several communication channels to a LiveChat, for example, messengers and an email inbox. Then a customer can choose where to communicate with the operator: on the website via the chat, in a messenger, or by email.
начало внимание
Only users included in the Administrators group can configure an online LiveChat.
конец внимание
Configure a chat
A separate online chat is created for each live chat. To add one, do the following:
- Go to Administration > Live Chats.
- Select a live chat from the list or create a new one by clicking +Live Chat in the upper right corner.
- Switch to the LiveChat tab and click Enable in the center of the page.
In the left part of the page, the online chat’s settings can be changed, while on the right you can see a preview of the online LiveChat that automatically alters based on the parameters you set.
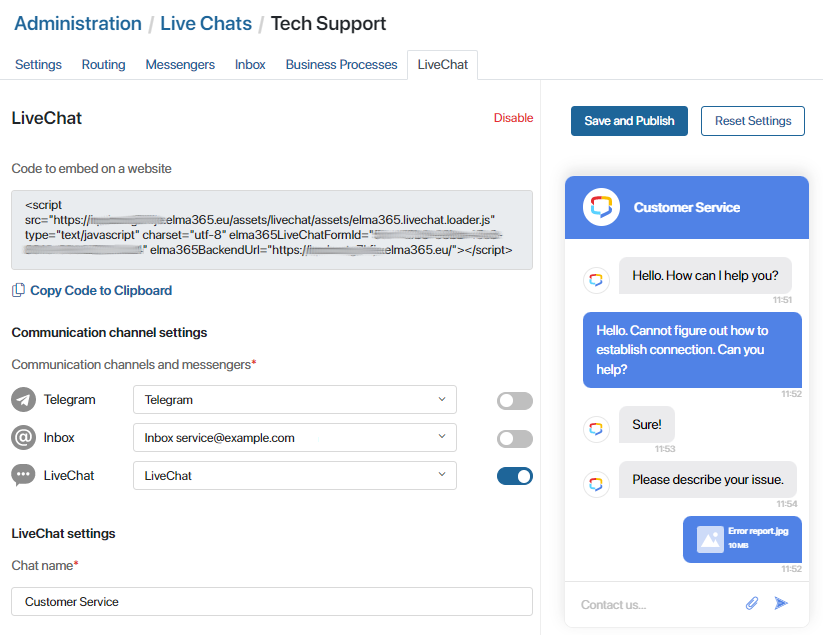
- Set the chat’s parameters:
- Communication channel settings. Toggle options on and off, selecting channels that customers will be able to use to send messages to the Live Chats workspace. You can choose any messengers or email inbox that are connected to the live chat and have the Active status.
The list of channels you select will be displayed when the user clicks the chat button on your website. Then they can select the way they want to send their message:
- Messengers. The user is redirected to the web version of the messenger.
- Inbox. The user fills out the request form in the chat window on the website, and the operator’s response will be sent to their email.
- LiveChat. The user stays on the website and communicates with the operator in the chat window.
- LiveChat settings. This section is shown if you toggled LiveChat on in the list of channels. Set parameters for the chat window:
- Chat name*. Specify the title of the online chat window, for example, Tech Support.
- Greeting*. Enter the text that the user will see when they open the chat.
- User authentication fields. Check the boxes next to the required fields that the user needs to fill out in the chat window to start communicating with the operator. You can select from Email, Name, and Phone. This data will be shown on the session page.
- Inbox settings. This section is shown if you toggled Inbox on in the list of channels. Set parameters for the chat window:
- Greeting*. Enter the text that the user will see when they open the chat.
- Required fields*. Check the boxes next to the required fields that the user needs to fill out in the chat window in order to send a message. Your email and Message body are required by default. You can additionally select Full name and Subject. This data will be shown on the session page.
- Design. Configure what the chat will look like:
- Logo. Upload an image that will be displayed on the open chat button.
- Theme. Select the main color of the chat.
- Button position. Specify the corner of the screen that the chat button will be placed in.
- Button size. Set the size of the button that opens the chat.
- Chat background. Select a background image for the chat.
- Link to the personal data processing policy. Specify a link that will be displayed in the chat window if the user needs to enter their personal details to send a message.
- To finish configuring the chat, click the Save and Publish button in the upper right corner of the page.
If needed, you can revert the chat’s configuration to default. To do that, click the Reset Settings button.
- Copy the generated code for embedding the chat in a website by clicking Copy Code to Clipboard in the upper part of the page.
- Embed the online LiveChat in your website.
Now users who visit your website can use the chat to contact you.
When a user writes a message in the chat for the first time, a new session is created. When the user contacts you again, the existing session reopens. Messages sent to online chats are processed by operators same as other messages.
Found a typo? Highlight the text, press ctrl + enter and notify us