
Подключите электронный почтовый ящик к линии в качестве одного из каналов сбора обращений от клиентов. Пользователи смогут написать письмо на вашу корпоративную почту, а операторы ответят на запрос из интерфейса ELMA365. При этом история переписки с каждым клиентом сохранится внутри системы.
При получении нового письма в разделе Линии создастся новая сессия. Её название будет соответствовать теме письма. Вы увидите имя пользователя и его почту. Если клиент уже обращался, предыдущая сессия возобновится, и сообщение отобразится в ней. Подробнее об этом читайте в статье «Обработать обращение».
В линиях, к которым подключена электронная почта, операторы могут начинать общение с клиентами самостоятельно. Как это сделать, читайте в статье «Создать сессию с внешним пользователем».
Кроме того, когда для линии настроен ELMA Bot, он может также реагировать на запросы пользователей: предлагать оператору подсказки для сообщений или отвечать вместо него. Подробнее о режимах работы бота читайте в статье «Подключить бота к линии».
начало внимание
Настроить подключение электронной почты к линии могут только администраторы системы.
конец внимание
Подключить почту
К одной линии вы можете подключить один почтовый адрес. Для этого:
- Перейдите в Администрирование > Линии.
- Выберите линию из списка или создайте новую, нажав кнопку + Линия в правом верхнем углу.
- Перейдите на вкладку Мессенджеры и почта и нажмите кнопку
 .
. - В открывшемся окне настроек выберите вкладку:
- Расширенные — настройки для подключения почты с помощью протоколов SMTP и IMAP, например, для почтового адреса с корпоративным доменом;
- Простые — настройки для подключения самых распространённых почтовых сервисов. На этой вкладке в полях Сервис*, Логин* и Пароль* достаточно указать наименование сервиса и логин и пароль от подключаемой электронной почты.

- Настройки учётной записи.
- E-mail* — укажите адрес подключаемой электронной почты;
- Сервис* — выберите почтовый сервис из выпадающего списка: Gmail, Mail, Yandex, Rambler, Yahoo, Outlook, Office365.
Если вы подключаете почту с корпоративным доменом, выберите опцию Другой и заполните настройки подключения протоколов SMTP и IMAP;
- Авторизация по OAuth2 — для подключения почтового ящика к линии можно использовать авторизацию через OAuth2. В этом случае передавать пароль от почты на стороне ELMA365 не требуется. Достаточно ввести электронный адрес в полях E-mail* и Логин*, затем указать почтовый сервис и авторизоваться в нём. Это обеспечивает простоту интеграции и дополнительную безопасность учётных данных.
Использование внешней авторизации при подключении почты доступно, если администратор системы настроил модуль OAuth2 для авторизации в почтовом сервисе. Подробнее читайте в статье «Пользовательский модуль OAuth2 для авторизации через сторонние сервисы».
начало внимание
Чтобы использование авторизации через OAuth2 для подключения почты стало доступно, администратору системы нужно включить фича-флаг enableLinesOauth2. Подробнее об этом читайте в статьях «Изменение параметров ELMA365 Enterprise» и «Изменение параметров ELMA365 Standard». Если вы используете поставку SaaS, для включения фича‑флага обратитесь к вашему менеджеру ELMA365.
конец внимание
- Настройки SMTP и IMAP подключения.
В этих блоках наименования серверов SMTP и IMAP указываются в формате:
- имя протокола;
- ваш домен или поставщик электронной почты — отделяется точкой;
- используемый порт подключения — отделяется двоеточием.
Примеры: smtp.myserver.com:465 и imap.myserver.com:993.
Параметры защиты подключения, от которых зависит цифровой порт, настраиваются администратором, создавшим электронный адрес.
Чтобы настроить подключение, заполните поля:
- SMTP сервер* — укажите параметры протокола исходящей почты, включая порт, например:
- 25 — для незащищённого соединения;
- 465 — для соединения с шифрованием TLS;
- 587 — для соединения с шифрованием STARTTLS;
- IMAP сервер* — укажите параметры протокола входящей почты, включая порт, например:
- 143 — для незащищённого соединения и соединения с шифрованием STARTTLS;
- 993 — для соединения с шифрованием TLS;
- Защита соединения — выберите способ шифрования данных, используемый сервером: STARTTLS или TLS. Если защита не применяется, установите Нет;
- Логин* и Пароль* — укажите учётные данные для подключаемого сервера SMTP или IMAP, которые можно запросить у администратора сервера.
Обратите внимание, в настройках некоторых почтовых сервисов необходимо дополнительно разрешить доступ к почтовому ящику по протоколу IMAP.
Настройки доступа по протоколу на примере сервиса Yandex
|
В этом блоке укажите подпись, которая будет добавляться к сообщениям в линии. Клиенты увидят её во входящих письмах. Вы можете пропустить этот шаг и указать подпись позднее.
Если вы не используете OAuth2-авторизацию, соединение с почтовым сервером произойдёт автоматически на основе данных, введённых ранее.
При использовании OAuth2 выберите из списка почтовый сервис, который указали в настройках. В открывшемся окне войдите в аккаунт, используя свои учётные данные.
Когда соединение будет успешно установлено, электронная почта подключится к линии. В настройках линии на вкладке Мессенджеры и почта вы увидите название и статус привязанного ящика.
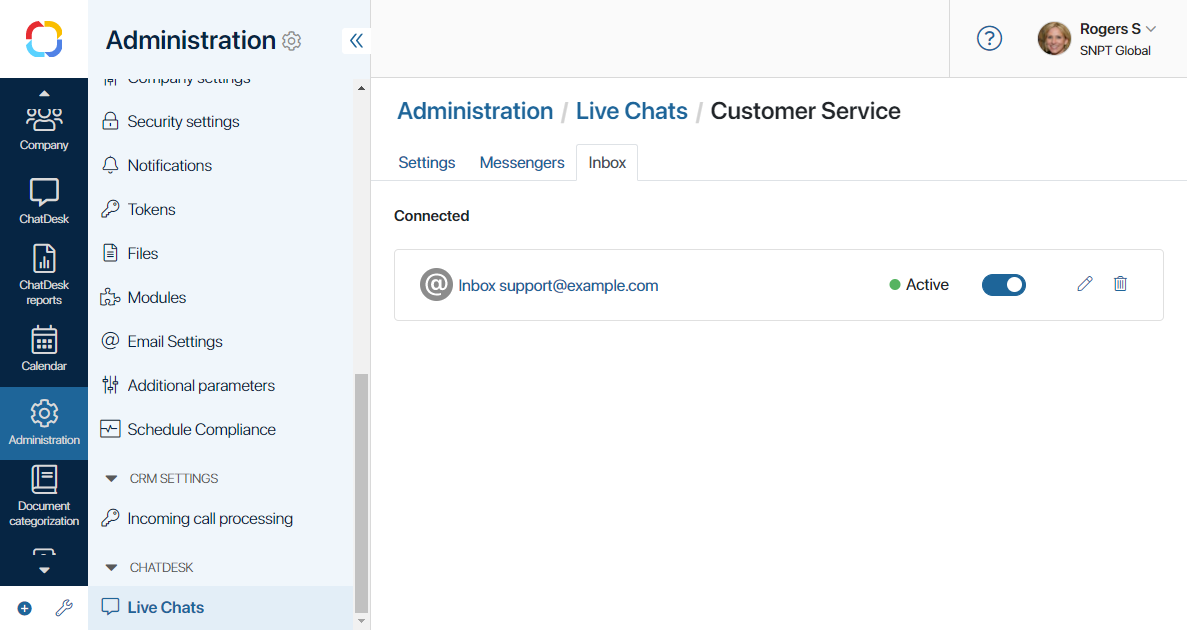
Чтобы отвязать линию от почты, нажмите на кнопку ![]() напротив её названия. Статус соединения изменится с Активен на Разорван. В дальнейшем вы сможете снова подключить почту к линии, нажав на эту кнопку.
напротив её названия. Статус соединения изменится с Активен на Разорван. В дальнейшем вы сможете снова подключить почту к линии, нажав на эту кнопку.
Справа от кнопки активации подключения доступны дополнительные опции:
![]() — нажмите на кнопку, чтобы перейти в Настройки подключения. Здесь вы сможете изменить подключенный адрес или отредактировать подпись;
— нажмите на кнопку, чтобы перейти в Настройки подключения. Здесь вы сможете изменить подключенный адрес или отредактировать подпись;
![]() — нажмите кнопку, чтобы удалить подключение почты к линии.
— нажмите кнопку, чтобы удалить подключение почты к линии.
Сбор пропущенных писем
Если по каким-то причинам недоступен канал, к которому подключена почта, накопленные письма не всегда поступят в линию после восстановления подключения. Рассмотрим разные случаи:
Накопленные письма поступят в линию |
Накопленные письма не поступят в линию |
|
|
|
|
|
Чтобы понять, почему письма не поступили в линию, рекомендуем собрать HAR-логи сервиса mailer за период разрыва соединения. Убедитесь в том, что происходят попытки автоматического переподключения.
Также вы можете ускорить получение уведомлений об ошибках подключения. Для этого в конфигурации сервиса mailer:
- уменьшите интервал проверки переподключений в параметре
ELMA365_MAILER_DLM_CHECK_CONNECTIONS_SECONDS; - сократите количество попыток в параметре
ELMA365_MAILER_IMAP_MAX_RECONNECT_ATTEMPTS.