
Когда кто-то пишет на линию, всем операторам этой линии приходит оповещение, а в левом нижнем углу главной страницы появляются счётчики новых обращений.
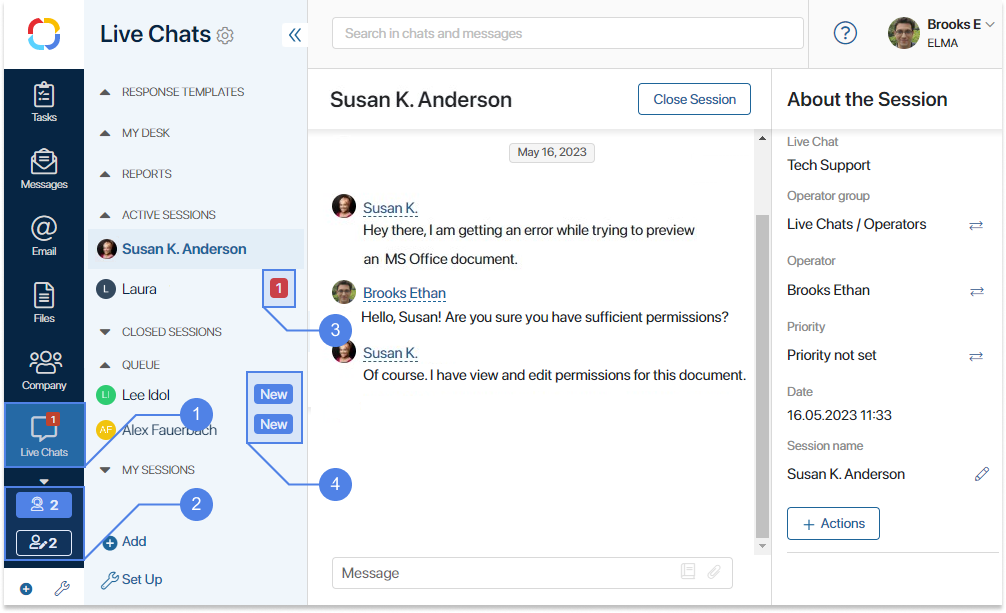
- Счётчик на названии раздела показывает оператору или супервизору с правами оператора количество сессий, назначенных на него, где есть непрочитанные сообщения.
- Счётчики внизу экрана отображают количество неназначенных сессий в очереди во всех линиях, за которые ответственен сотрудник:
 — виден только операторам;
  — доступен супервизорам.
Пользователи, включённые в группу Администраторы, могут скрыть счётчики нераспределённых сессий.
- Число рядом с названием сессии обозначает количество непрочитанных сообщений в этой сессии.
- Значок New ставится напротив неназначенной сессии в общем списке сессий.
В общих настройках линий администраторы системы могут включить звуковые сигналы для операторов при поступлении нового обращения.
Страница сессии
Чтобы взять сессию в работу, первый освободившийся оператор может нажать на синий счётчик в левом нижнем углу страницы. Откроется страница с чатом. Сессия при этом будет автоматически назначена на текущего оператора.
Также оператор может выбрать сессию из группы Очередь, перейти на страницу чата и на верхней панели нажать кнопку Взять в работу.
Обратите внимание, операторы со статусом Офлайн могут только просматривать сессии. Чтобы обработать обращение или изменить параметры сессии, оператору нужно установить статус Онлайн. Подробнее об этом читайте в статье «Статус оператора».
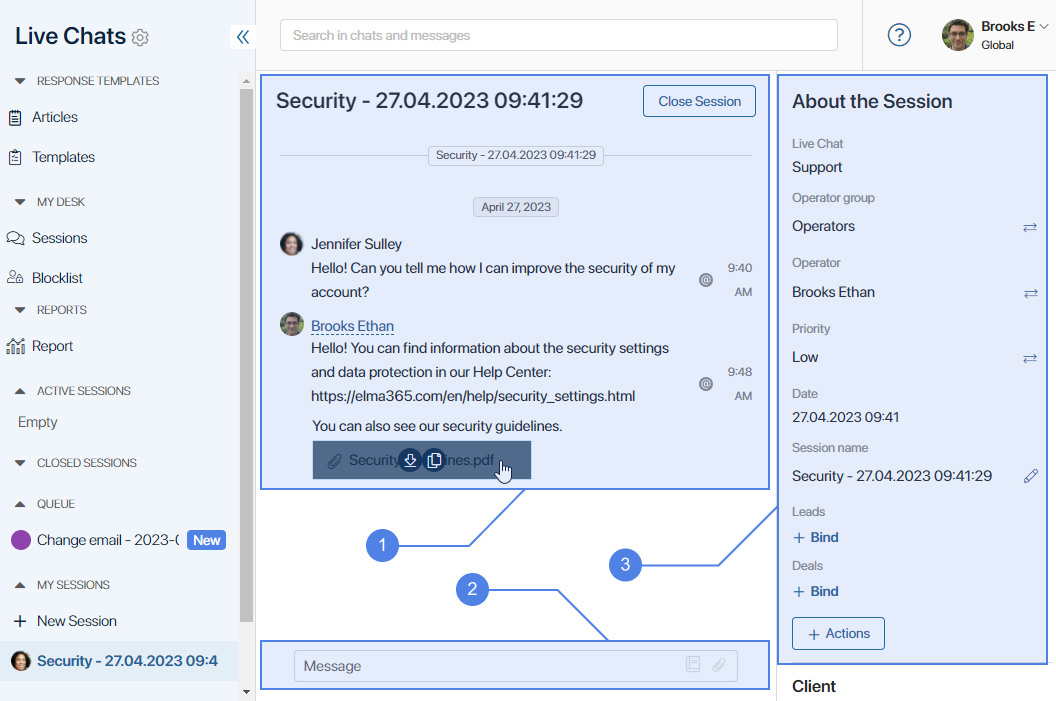
Страница сессии разделена на три части:
- в меню слева расположены приложения Сессии, Черный список и SLA, справочники Шаблоны ответов, страница Отчёт, а также все доступные пользователю сессии, разделённые на группы. Подробнее об этом читайте в статье «Как организована работа в линиях»;
- в центре страницы размещено диалоговое окно для общения с пользователем;
- на боковой панели справа можно посмотреть информацию о сессии.
Диалоговое окно
В диалоговом окне оператор ведёт переписку с пользователем. Если пользователь обратился из мессенджера, справа от его сообщений будет отображаться значок мессенджера.
Для обработки обращений через электронную почту используется интерфейс почтового клиента. Он позволяет указывать основных, вторичных и скрытых получателей, а также создавать цепочки писем, отвечая на любое сообщение клиента. Подробнее читайте в статье «Обработать обращение из электронной почты».
Для оператора доступны следующие действия:
- В контекстном меню сообщения можно:
- скопировать текст сообщения;
- процитировать сообщение в своём ответе. Нажав на цитату, можно перейти к изначальному сообщению. Цитирование доступно для всех каналов, кроме ViberBot.
Важно: отвечая на комментарии из Telegram-канала, всегда используйте цитирование. Тогда в Telegram ответ отобразится под постом. Это нужно, поскольку все комментарии отображаются в одной сессии и без цитирования подписчик не увидит ваше сообщение. Публикация постов из сессии в канал недоступна; - скопировать ссылку. Для этого нажмите правой кнопкой мыши на неё и в контекстном меню выберите нужное действие;
- отредактировать своё сообщение и заменить отправленный файл в сессиях:
- внутренней линии для пользователей ELMA365;
- из канала LiveChat. При подключении канала администратор также может разрешить обратившимся пользователям изменять свои сообщения;
- из канала Telegram или TelegramBot в течение 48 часов с момента отправки сообщения;
Опции изменения сообщения и удаления файла отображаются в активной сессии, если редактирование разрешено в общих настройках линий.
- При наведении курсора на прикреплённый к сообщению файл можно:
 — загрузить файл на компьютер;
 — сохранить копию файла в выбранной папке раздела Файлы;
 — скопировать ссылку на загрузку файла;
- открыть файл в режиме просмотра, нажав на синюю область вокруг файла.
- В окне чата можно взаимодействовать с голосовыми сообщениями, которые присылает пользователь:
- прослушать сообщение с помощью кнопки
 ;
; - загрузить сообщение на компьютер, нажав
 ;
; - изменить скорость воспроизведения голосового сообщения с помощью кнопки
 .
.
- Доступно переименование сессии. Для этого вверху страницы нажмите значок
 и введите новое название.
 - Внизу страницы расположено поле для ввода ответа оператора, в котором можно:
- отправлять текстовые сообщения или использовать готовые шаблоны ответов, нажав значок
 ;
; - прикреплять файлы с компьютера, из раздела Файлы или с карточки элемента приложения, с которым оператор связал сессию, например заявки или рекламации;
- с помощью значка
 открыть меню встроенного HTML-редактора и отформатировать введённый текст.
- При закрытии страницы сессии неотправленное сообщение сохранится в поле для ввода.
- Когда переписка с клиентом закончена, нажмите кнопку Закрыть сессию. Супервизор и все операторы линии получат оповещение в #ленту. Сессия станет неактивной, но история переписки сохранится в системе и будет показана в чате при следующем обращении этого клиента.
Кроме того, администратор системы может управлять доступными комбинациями клавиш для отправки сообщений, а также включить отображение окна подтверждения перед отправкой. Подробнее читайте в статье «Общие настройки линий».
Контролировать процесс обработки обращений помогают:
- Системные уведомления в чате сессии, позволяющие отслеживать историю работы над обращением. Они доступны только в интерфейсе ELMA365 и не отправляются клиенту.
- Оповещения о ходе обработки сессии, настроенные по умолчанию. Например, о взятии в работу, переназначении, закрытии и т. д.
- Пользовательские уведомления. Это могут быть оповещения о разных событиях, происходящих в рамках бизнес-процессов. Например, о переименовании сессии, изменении её приоритета или смене статуса заявки, связанной с сессией. Такие уведомления настраивает администратор системы с помощью скрипта. Подробнее читайте в статье «Настроить автоматический запуск бизнес‑процесса».
Информация о сессии
На правой боковой панели страницы сессии выводится основная информация о сессии и обратившемся клиенте:

- В правом верхнем углу расположен значок
 , который позволяет сотрудникам в статусе Онлайн выполнять следующие действия с сессией:
- Перевести на бота — опция отображается при активированном решении ELMA365 Omni, если к линии подключён чат‑бот. С её помощью оператор может перевести сессию на бота, например, при окончании рабочего дня. В таком случае запрос клиента продолжит обрабатываться ботом по настроенным в нём сценариям. Чтобы перевести сессию снова на сотрудника или группу операторов, в поле Оператор или Группа операторов необходимо нажать кнопку
 и выбрать пользователя или группу. В #ленту оператора или группы сотрудников придёт оповещение о переназначении сессии;
 - Запустить бизнес-процесс — в ходе беседы оператор может запустить экземпляр любого настроенного бизнес-процесса из диалога с пользователем, например, при получении от клиента какой‑либо заявки. В таком случае оператор узнаёт у клиента необходимые данные и запускает процесс обработки заявки. Входные параметры для полей бизнес-процесса при этом указывать не нужно. Подробнее об этом читайте в статье «Запустить бизнес‑процесс из сессии вручную»;
- Пометить как спам — при выборе этой опции сессия перестанет отображаться в общем списке, распределяться правилами маршрутизации, учитываться в отчётах и влиять на автоматический запуск бизнес-процессов.
Обратите внимание, просмотреть список заблокированных сессий могут только сотрудники, которым администратор системы предоставил доступ к приложению Сессии;
- Убрать из спама — при нажатии сессия восстановится из спама. Действие отображается, если сессия заблокирована;
- Системные сообщения — вы можете временно отобразить или скрыть системные уведомления в чате, например, о применении правила маршрутизации, переназначении сессии и т. д. После обновления страницы применяться общие настройки отображения таких оповещений, установленные администратором.
- Дата создания и состояние беседы, а также название линии.
- Приоритет сессии, который задаётся супервизором или оператором и позволяет определять степень важности обращения. Кнопка используется для изменения приоритета. Для выбора доступны Высокий, Средний и Низкий приоритеты. По умолчанию устанавливается значение Приоритет не задан.
- Ответственный оператор и группа, в которую он входит. Кнопка используется для переназначения сессии на другого оператора или группу, указанную в настройках линии. Для выбора могут быть доступны только операторы в статусе Онлайн, если администратор системы включил ограничение в общих настройках линий.
Например, когда оператор основной группы не может обработать пришедший запрос, он передаёт сессию в работу специалистам определённой области, например, сотрудникам бухгалтерии. В #ленту оператора или группы сотрудников придёт оповещение о переназначении сессии. - Приложение, которое было выбрано при настройке линии в поле Для фиксации обращений. Чтобы создать элемент выбранного приложения, например, добавить заявку или рекламацию, нажмите кнопку + Связать, а затем значок
 .
.
Чтобы удалить связь между сессией и элементом приложения, наведите курсор на название элемента и нажмите на появившийся значок корзины.
- Информация о клиенте:
- для сотрудника, обратившегося из ELMA365, в поле Внутренний пользователь вы увидите ссылку с именем пользователя в системе;
- для пользователя, обратившегося из подключённого к линии мессенджера, отобразятся данные из аккаунта: имя, аватар, учётная запись, наименование мессенджера.
При обработке обращений для операторов в статусе Онлайн доступны различные действия со списком клиентов:
- занести клиента в базу данных — создать запись с данными пользователя в приложении, указанном при настройке линии в поле Для связи учетной записи. Для этого под названием приложения нажмите + Связать, а затем кнопку ;
- изменить список клиентов — если в качестве канала используется электронная почта, в рамках сессии можно отправлять сообщения на несколько электронных адресов. Вы можете:
- добавить получателей — рядом со списком клиентов нажмите + Добавить и укажите нужные учётные записи. Для выбора доступны только пользователи, которые уже обращались в линии через электронную почту;
- удалить получателей — рядом с именем пользователя нажмите на три точки и выберите Удалить клиента. Обратите внимание, нельзя удалить основного клиента, который направил обращение в линию или указан оператором при создании сессии;

- заблокировать или разблокировать клиента — добавьте пользователя в чёрный список, чтобы его обращения автоматически помечались как Спам, или разблокируйте его. Для этого нажмите на три точки рядом с его именем и выберите нужную опцию.
Администратор устанавливает, кто из сотрудников может блокировать учётные записи клиентов и возвращать их из чёрного списка со страницы сессии. По умолчанию действия доступны операторам и супервизорам.
Поиск по разделу «Линии»
В верхней части радела Линии находится строка поиска. По умолчанию поиск производится по сессиям и сообщениям:
- если открыта определённая сессия, то поиск идёт по её названию и истории сообщений в ней;
- если переписка с клиентом не открыта, то поиск происходит только по названиям сессий.
В остальном поиск осуществляется так же, как в чатах раздела Сообщения.
Найти сессию по определённым параметрам, например, дате создания или оператору, могут пользователи, которым администратор системы предоставил доступ к приложению Сессии. Подробнее читайте в статье «Поиск и фильтры».