
Виджет Связанные элементы позволяет отобразить элементы из одного приложения в карточке другого в виде таблицы.
Например, при создании заказа сотрудник выбирает компанию-клиента. Вы можете отобразить в карточке компании таблицу со всеми её заказами. Сотрудники смогут посмотреть их данные и открыть любой из них.
Обратите внимание, виджет используется только для просмотра списка связанных элементов. Чтобы сотрудники могли добавлять заказы из карточки компании, используйте поле типа Приложение. Если вы создаёте в приложениях Компании и Заказы поля со ссылками друг на друга, связанные элементы можно автоматически синхронизировать через настройку Поле для связи.
Как настроить виджет
Вы можете добавить виджет Связанные элементы в карточку любого приложения. Рассмотрим, как с помощью виджета отобразить элементы приложения Заказы в карточке компании.
Шаг 1. Добавить в приложение «Заказы» ссылку на приложение «Компании»
- Откройте настройки формы приложения Заказы.
- Добавьте поле типа Приложение и выберите в его настройках Компании.
- Включите опцию поиска и сортировки, чтобы поле можно было использовать при настройке виджета Связанные элементы.

- Сохраните настройки.
Шаг 2. Разместить виджет «Связанные элементы» в карточке компании
- Перейдите к настройке форм приложения Компании.
- В расширенном режиме настройки форм на вкладке Просмотр откройте форму приложения в дизайнере интерфейсов.
- Если вы хотите расположить таблицу заказов отдельно от информации о компании, добавьте новую вкладку Заказы, нажав рядом с существующими вкладками значок +.
- Разместите на форме виджет Связанные элементы, нажав + Виджет или перетащив его с боковой панели.

- В открывшемся окне задайте настройки виджета:
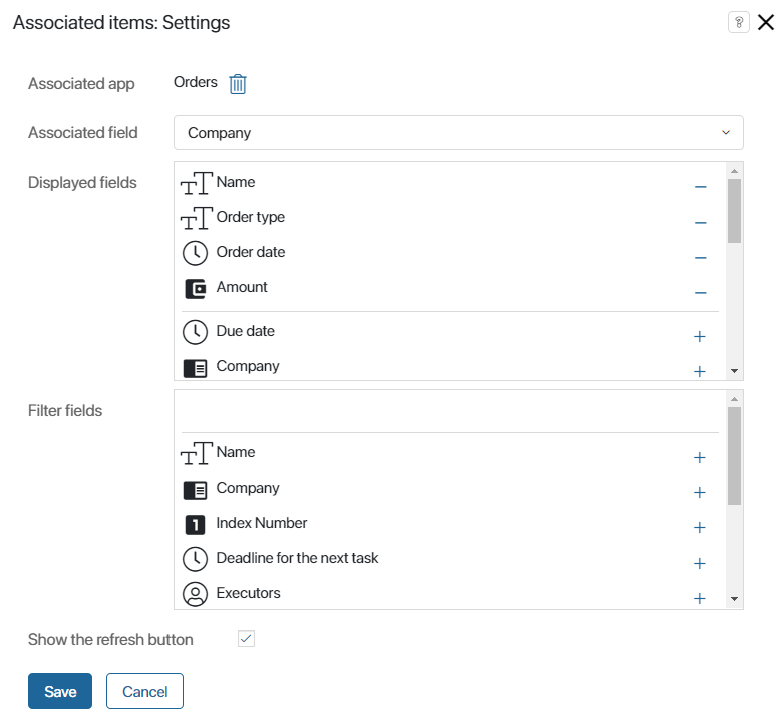
- Связанное приложение — укажите приложение, данные которого будут отображаться на настраиваемой форме, в нашем примере — Заказы;
- Поле связи — выберите поле типа Приложение из указанного приложения. Например, из приложения Заказы выберите поле Компания, добавленное на шаге 1;
- Отображаемые поля — определите поля приложения, которые будут отображаться на настраиваемой форме. Чтобы добавить поле, нажмите +;
- Поля для фильтрации — выберите свойства приложения, которые будут использоваться для поиска элементов. Пользователь сможет выбрать значения этих полей над списком связанных элементов. Чтобы добавить свойство, нажмите +;
- Показывать кнопку обновления элементов — включите опцию, чтобы над списком связанных элементов отображалась кнопка для обновления данных.
- Сохраните настройки виджета.
- Для завершения настройки формы нажмите Сохранить и Опубликовать на верхней панели дизайнера интерфейсов.
Виджет в карточке элемента
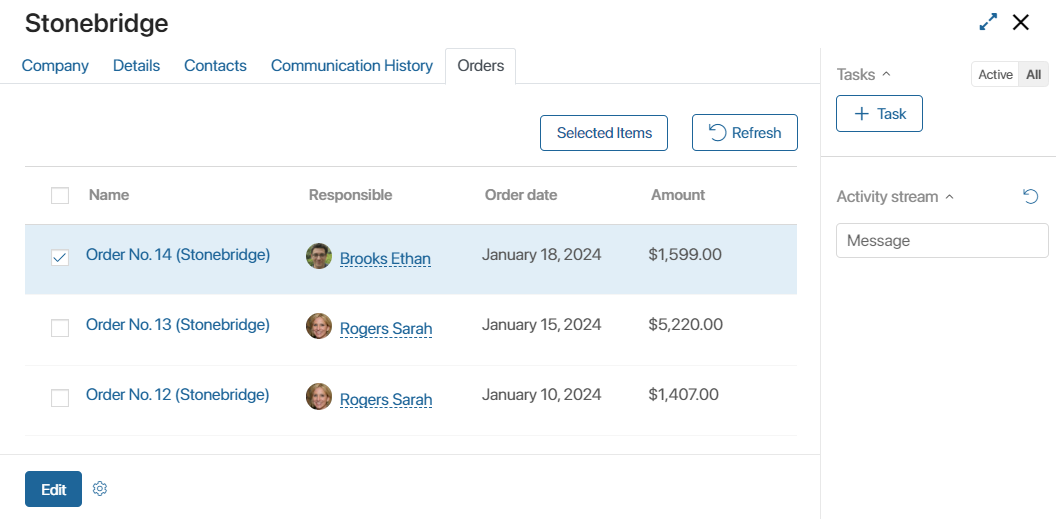
В нашем примере после настройки виджета в карточке каждой компании появится дополнительная вкладка Заказы. На ней будут отображаться все элементы приложения Заказы, для которых при создании указана эта компания.
Если в приложении Заказы включена опция Массовые действия, вы сможете редактировать, удалять или изменять статус связанных с компанией элементов прямо с её карточки.
Вы можете изменить ширину любой колонки таблицы. Для этого наведите курсор на её заголовок и перетащите появившуюся границу колонки до нужной ширины. Настроенная ширина сохранится для всех элементов и форм приложения.
Обратите внимание, если вы удалите заказ, связанный с определённой компанией, то с карточки компании он также удалится.