
You can restrict users from sending messages to live chats via external channels such as instant messengers and email. Note that you cannot lock internal users.
When a user whose account is locked sends a message, a new session is created in the Live Chats workspace. This session is automatically marked as Spam. Such sessions aren’t added to the common queue, checked against the routing rules, or included in reports. They also don’t trigger the start of business processes.
To lock accounts, use the Blocklist app. In this app, you can create two types of entries:
- Blocklist entries. These are rules for locking one or more accounts.
- Allowlist entries. These are exceptions, that is, rules for excluding certain accounts from the locking rules.
For example, there can be a rule in the blocklist that locks email addresses with the @example.com domain. To allow a specific user with this domain to send messages to a live chat, you need to create an exception for the user1@example.com address in the allowlist.
View options
By default, entries in the Blocklist app are displayed as a table that includes the following data: the list name, the item name, the parameters set when creating the rule, the date until which the rule is applicable, and the live chats that the rule is applied to.
You can customize the table by adding new columns or changing the sorting parameters.
Alternatively, rules can be viewed as tiles that can also be customized.
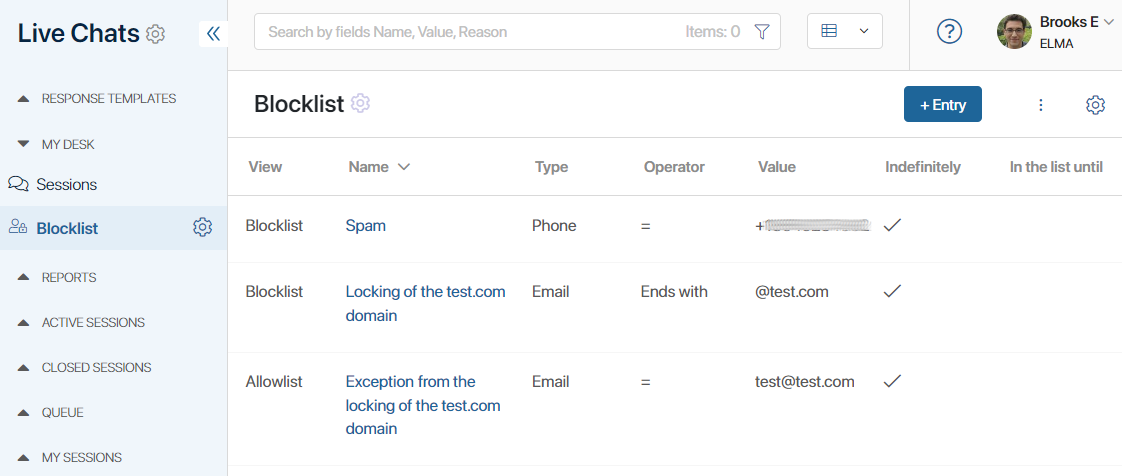
By default, all users who have access to the Live Chats workspace can work with the Blocklist app. Users included in the Administrators group can change this by restricting access to the app.
Add a rule to the blocklist or allowlist
You can add a new entry to either list in two ways:
- From the Blocklist app. In the upper right corner, click the +Entry button.
- From the session page. On the right-hand panel of the chat page, next to the client’s name, click the
 icon. Then click Lock Account. This cation is only available to operators in the Online status.
No matter which method you use, the entry creation window will open:
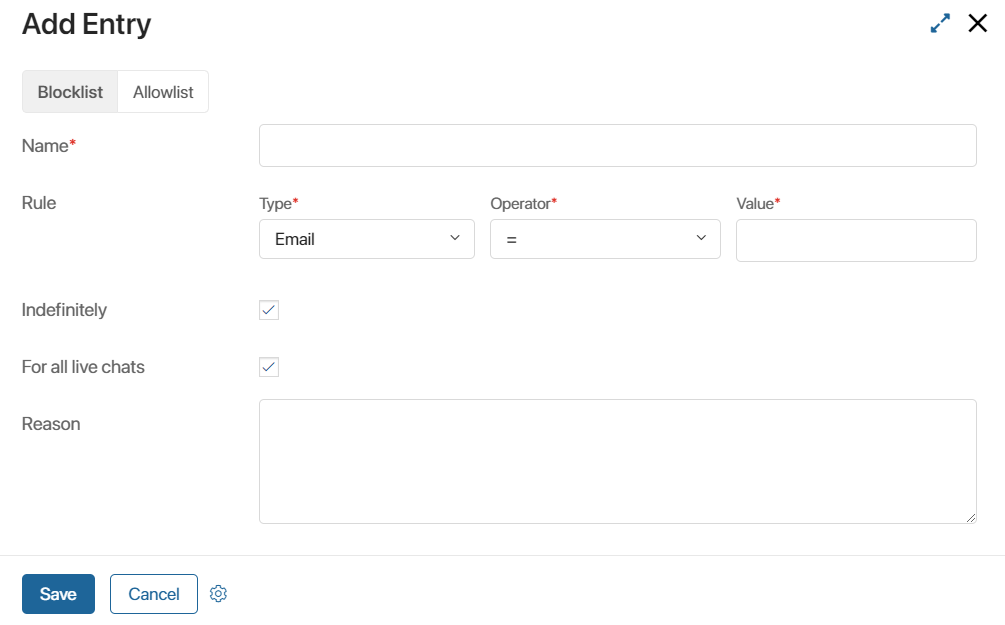
- Select the list that a new entry will be added to:
- Blocklist. The account will be locked. When a locked user sends a message to a live chat, the new session will be automatically marked as Spam. It won’t be added to the common queue.
- Allowlist. The account will be added as a blocklist exception. When a user sends a message to a live chat using this account, the new session won’t be marked as Spam, and operators will be able to start working on it.
- Name*. Enter the name of the entry that will be displayed in the table within the app. If you are creating the entry from a session’s page, this field is filled out automatically.
- Rule. Set parameters for adding an account to the blocklist or allowlist. When creating an entry from a session’s page, the parameters will be filled out automatically.
- Type*. Select the property of the account that will be checked. The following options are available: Email, Phone, Account, External ID in the messenger.
- Operator*. Select the logical operator that will be used to check the property specified in the Type field. The following options are available: the equal sign, Contains, Starts with, and Ends with. Note that, depending on the value selected in the Type field, different logical operators may be available.
- Value*. Enter the value the property is checked against. If they match, the account is added to the list.
For example, to add a specific user to one of the lists, select the Phone type, choose the equal sign as the operator, and paste the needed phone number into the Value field. To add several accounts to a list, for example, to lock all users with a specific domain name, select Email and the Ends with operator, then enter @example.com in the Value field.
- Indefinitely. The account will stay in the list until an operator or supervisor manually deletes it. Read more about deleting entries below.
- In the list until*. The field is available if the Indefinitely option is not active. Specify when the account needs to be deleted from the list.
- For all live chats. The account will be locked or considered an exception in all existing live chats.
- Only for live chats*. This field is available only if the For all live chats option is disabled. Select the live chats that the rule will be applied to.
- Reason. Specify the reason the account is included in the blocklist or allowlist.
Click the Save button. Information about adding the account to the list will be displayed in the table within the Blocklist app.
Note that if there are active sessions with the locked account, they need to be manually marked as spam or closed.
Unlock an account
You can delete an account from the blocklist or allowlist in the following ways:
- In the Blocklist app, open an account’s page and click Delete on the bottom panel.
- When creating a new entry in the Blocklist app, disable the Indefinitely option and specify the date when the account should be unlocked in the In the list until field. The account will be automatically unlocked on that date, and the user will be able to send messages to live chats.
Note that in this case, the entry with the rule will not be deleted from the table within the app, but it won’t be used by the system.
- In the Blocklist app, create an exception, that is, add an account to the Allowlist. This option is convenient if several accounts are locked using one rule. By creating another rule in the allowlist, you can exclude an account from the blocklist.
- Open the page of a session with the locked user. Read more about searching for a specific session in the Session list article. On the session page, click the icon next to the client’s name. In the menu that opens, select Unlock account. An entry from the Blocklist app opens. You can delete it. Note that the icon is not visible to operators in the Offline status.
After an account is unlocked, new sessions with the user will be added to the common queue in the Live Chats workspace.
Note that sessions created while the account was locked will still be marked as Spam. To return a session from spam to the common queue, you need to manually change its status. Read more in the Lock a session.
Change parameters in an existing entry
You can change the parameters of an existing entry in the Blocklist app. For example, you can correct the rules set up in it, change its name, edit the reason for locking the account, or specify a different unlock date.
To do that, open the entry’s page in the Blocklist app and click Edit. Make changes to the item and save it.
Search for entries
Open the Blocklist app. At the top of the page, you can see the search bar. Use it to quickly find the entry you need by the name, value, or reason specified on its page.
To filter entries by different parameters, for example, by unlock date, click the ![]() icon.
icon.
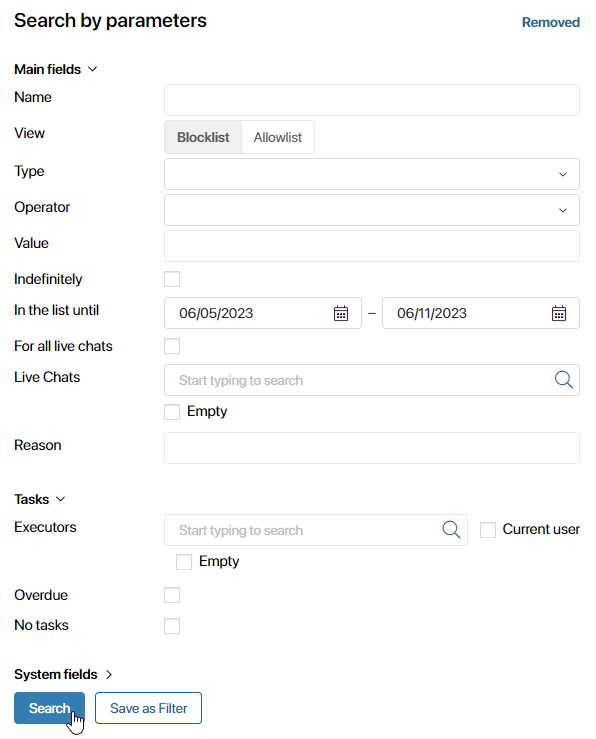
To open the list of entries deleted from the blocklist and allowlist, in the upper right corner of the Search by parameters window, click on the Removed link.
If you’re planning to use the same set of search parameters more than once, you can save it as a filter. Read more in the Search and filters article.
Found a typo? Highlight the text, press ctrl + enter and notify us